Read the tooltip, then build one valuable contact first
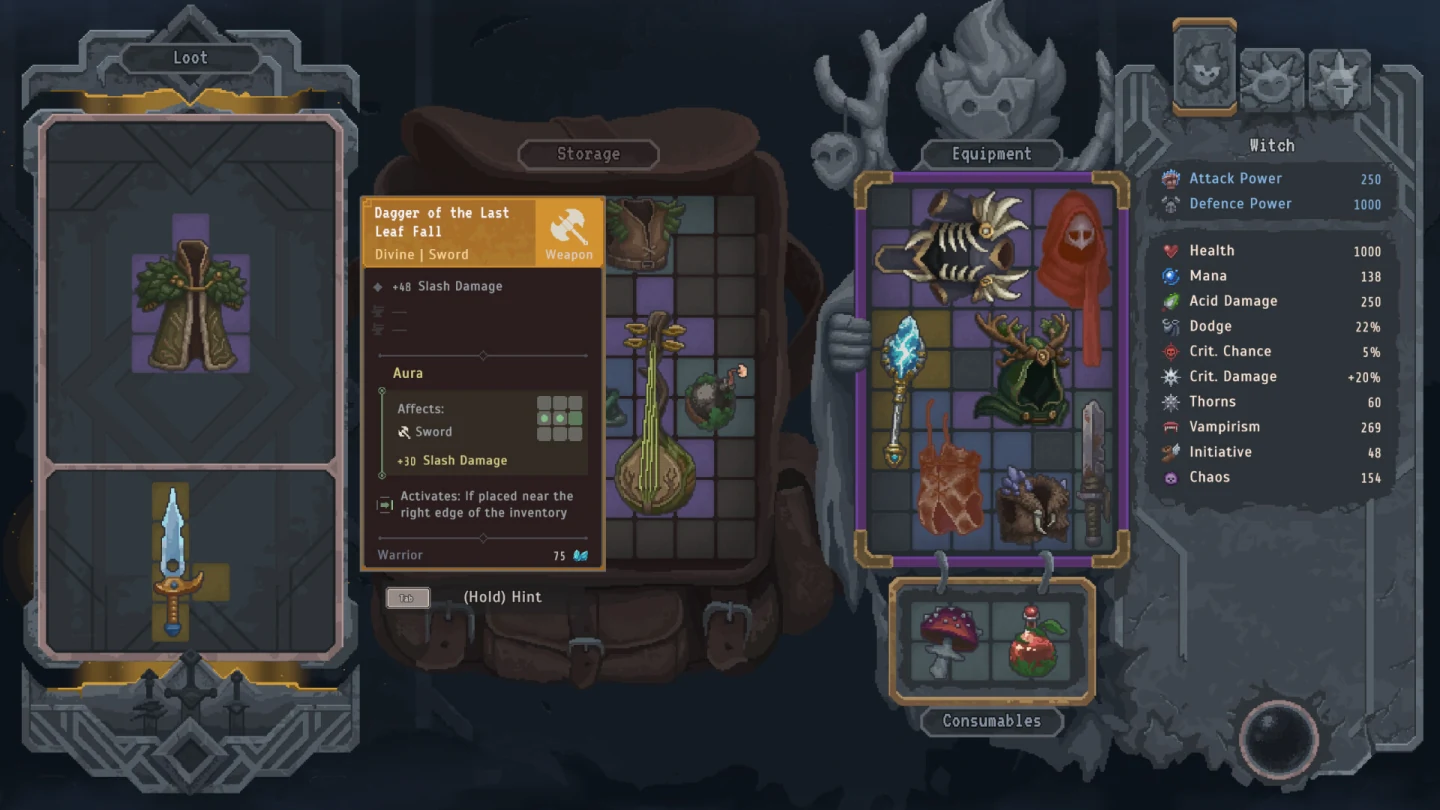
Place an aura only after identifying the item type, edge, or relationship named by its tooltip. Do not count every touching item as active. Put the highest-value compatible target beside the aura first, confirm the effect is active in the interface, and arrange secondary contacts around that proven pair. One working relationship is better than a crowded ring of gear that does not satisfy the condition.
Treat the aura and its best target as a combined anchor. Rotate both pieces together until they use the fewest awkward cells while preserving the required contact. Add other gear only after the anchor works. This keeps a later reward from forcing a complete rebuild just to maintain one important effect.
Measure the real cost of an aura
An aura costs more than its own occupied cells. It also reserves neighboring positions for compatible gear and can prevent long shapes from rotating through the same area. Compare the value created by each active contact with the flexibility lost around it. An aura that strengthens one core weapon can justify that cost; an aura that forces several weak items into the grid cannot.
Keep the least important side of the aura near an edge when possible, leaving the most useful sides available for real targets. Preserve a connected open area elsewhere on the board. This creates two zones: a stable effect cluster and a flexible upgrade zone. Mixing filler into every side makes both zones harder to manage.
- Reserve contacts for items that perform the current job.
- Place low-priority sides near an outer boundary.
- Leave a connected area for future shapes.
- Do not use rarity as proof that a contact is worthwhile.
Recheck activation after every movement
Rotation can preserve physical contact while changing the edge or orientation required by the effect. After moving any piece in the cluster, inspect the interface and tooltip again. Confirm the intended target receives the effect before evaluating the rest of the board. This small check prevents a visually tidy layout from carrying an inactive relationship through several encounters.
When replacing a target item, evaluate the new shape in the aura position and outside it. If the new item is strong without the aura, freeing the contact for a better target can improve the whole grid. If it depends on the aura, compare the combined pair against the pair being removed. The decision is between complete relationships, not individual tooltips.
- Identify the exact compatible target described by the aura.
- Place and rotate the target beside the correct edge.
- Confirm activation in the current interface.
- Install secondary gear without disturbing the primary pair.
- Repeat the activation check after each later swap.
Assign aura clusters to clear character roles
A damage aura belongs on the grid whose job is damage; a support relationship belongs where automatic triggers can use it consistently. Separate character inventories make it possible to avoid one overloaded board. Move a secondary function to a companion when the main hero's aura cluster needs the cells for its core plan.
Companion auras should support behavior that occurs without manual timing. Give the companion a repeatable target, effect, or protection loop and keep its aura contacts simple. A dense arrangement with several conditional effects is less reliable when the player cannot choose every companion action. The best companion layout is the one that keeps producing its intended value while attention remains on the main hero.
| Healthy cluster | Warning sign |
|---|---|
| One clear role | Several unrelated bonuses |
| Primary contact visibly active | Contact assumed from appearance |
| Connected open space remains | Only isolated cells remain |
| Easy local replacement | Every swap moves the entire board |
Fix an aura layout that stopped improving
Remove every item that does not activate the aura or serve the character's role. Rebuild the primary pair, then add back only gear that produces measurable value. If the remaining cluster is still too expensive in cells, keep the stronger individual item and release the aura space. An effect is not mandatory merely because the board can technically activate it.
A good aura layout remains easy to explain: this item provides the effect, this compatible item receives it, these secondary pieces support the same job, and this open area accepts upgrades. When the explanation becomes a list of exceptions, the grid needs simplification.