Place the build anchor first and keep one flexible lane
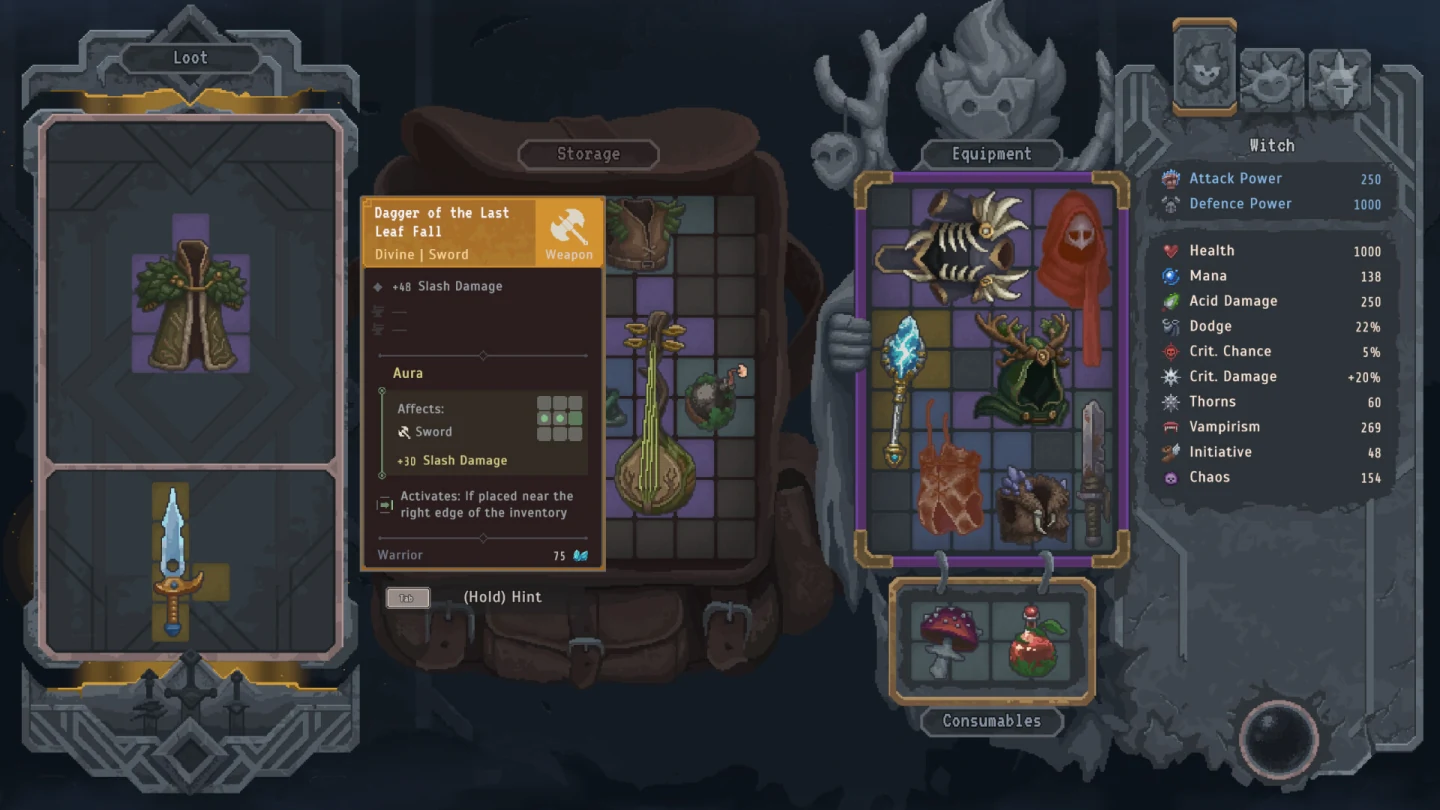
Start every inventory rebuild with the item that defines the character's job. Place the primary weapon, key aura, or repeatable support effect first, rotate it into a stable orientation, and build outward. Keep one useful strip or pocket open for future shapes. A board packed edge to edge can look efficient while leaving only isolated cells that no meaningful reward can use.
Each hero and companion has a separate equipment grid. Treat those grids as distinct jobs rather than overflow storage. Put direct-control timing on the main hero and give companions layouts that produce value automatically. This reduces mid-run reshuffling and makes each new drop easier to compare with the exact role it would replace.
Rotate for usable space, not the fewest empty cells
Rotation changes both fit and opportunity cost. Before confirming a layout, rotate long or uneven pieces through every practical orientation and inspect the empty space that remains. One connected rectangle or lane is more useful than the same number of cells divided into corners. Preserve spaces that can accept several future shapes instead of optimizing only for the current set.
When two arrangements provide the same active effects, choose the one with cleaner boundaries around the anchor. This makes later substitutions local: one support item can leave without forcing the weapon, aura, and defense to move together. A stable board is not the board with zero gaps; it is the board that can accept a real upgrade without collapsing.
- Prefer connected open cells over scattered single cells.
- Keep irregular pieces near an edge when that protects the center.
- Do not trap a required aura target behind disposable filler.
- Recheck contacts after every rotation.
Rebuild only when the final board gains a clear advantage
A new reward is not an upgrade until the complete post-swap board is stronger. Name the item that leaves, every contact that breaks, and every cell that changes purpose. Then compare damage, survival, automatic role reliability, and remaining flexibility. If the reward improves one tooltip while damaging two active relationships, leave the established board intact.
Perform a full rebuild when the new item changes the central damage plan or creates a much stronger anchor. Remove low-impact filler first, place the new anchor, restore the best compatible contacts, and add defense last. Moving several pieces together is cleaner than forcing the new shape into the only visible gap and then patching the damage afterward.
- Take a mental snapshot of the current anchor and active contacts.
- Remove filler and the exact item being replaced.
- Place and rotate the new anchor before anything else.
- Restore only contacts that serve the new plan.
- Confirm the character still performs one clear job.
Use separate grids to solve separate party needs
The main hero does not need to carry every answer. If its grid is optimized for Slash health pressure, assign armor handling or repeatable support to a companion. If the hero uses a setup-heavy plan, equip companions for early stability. Separate grids allow specialization without forcing unrelated item types into one cramped layout.
Companions act automatically, so compact reliable effects are especially useful for them. Avoid a companion layout that requires precise timing or constant manual target correction. The inventory should make the intended trigger likely to occur and should preserve enough survival for that companion to keep acting through the difficult rounds.
| Grid role | Anchor question | Space priority |
|---|---|---|
| Main damage | What action ends threats? | Weapon and its best contacts |
| Armor answer | Who opens armored targets? | Consistent Crush or Acid lane |
| Support | What keeps the party functioning? | Reliable buffs, healing, or protection |
| Durability | Who must survive for the plan to work? | Defense without blocking the core |
Diagnose a grid that feels stuck
If useful rewards never fit, remove the weakest item and rebuild around connected open space. If damage dropped after a swap, inspect broken contacts before blaming the new item. If companions fail to contribute, simplify their grid to one automatic role. If the board works in ordinary fights but fails at bosses, preserve the core and replace filler with survival, mana support, or the damage lane the encounter blocks.
Do not preserve a modified, rare, or temporary item solely because it was expensive to obtain. Its current board value decides whether it stays. A disciplined grid remains readable: one anchor, several verified supporting contacts, enough defense for the role, and open space with a purpose.