Read the room icon before committing the route
The current Lootbound map legend labels are Enemy, Elite Enemy, Consumables, Chest, Training, Companion, Blacksmith, Deity, Camp, Ability, Sentinel Part, and Sentinel. Read the exact icon before committing, then choose the branch whose room addresses the party's current combat, supply, recovery, recruitment, improvement, or final-fight need.
There is no fixed best route for every run. Compare the legend with current Health, Armor, party roles, grid space, and the rooms visible farther along each branch. A useful next node can still create a poor route when the following room demands risk the party cannot carry. Solve one visible problem without routing directly into another.
| Legend label | Practical route purpose |
|---|---|
| Enemy | Standard combat room; take it when the party is ready for another ordinary fight |
| Elite Enemy | Higher-risk combat room; enter when damage and survival are stable |
| Consumables | Consumable choice; inspect the currently presented supply before committing |
| Chest | Loot opportunity; route here when a current grid has a useful destination |
| Training | Dice-and-reward room; compare the visible requirement and payoff |
| Companion | Companion choice; inspect the shown abilities and the party role they can fill |
| Blacksmith | Presented gear-improvement choice; read the current option before investing |
| Deity | Deity choice; inspect the option shown in the room before committing |
| Camp | Health recovery stop; compare current Health with the risk required to reach it |
| Ability | Distinct ability room; inspect the presented ability option |
| Sentinel Part | Biome-end part choice that contributes to the final encounter |
| Sentinel | Final encounter under the current in-game UI name |
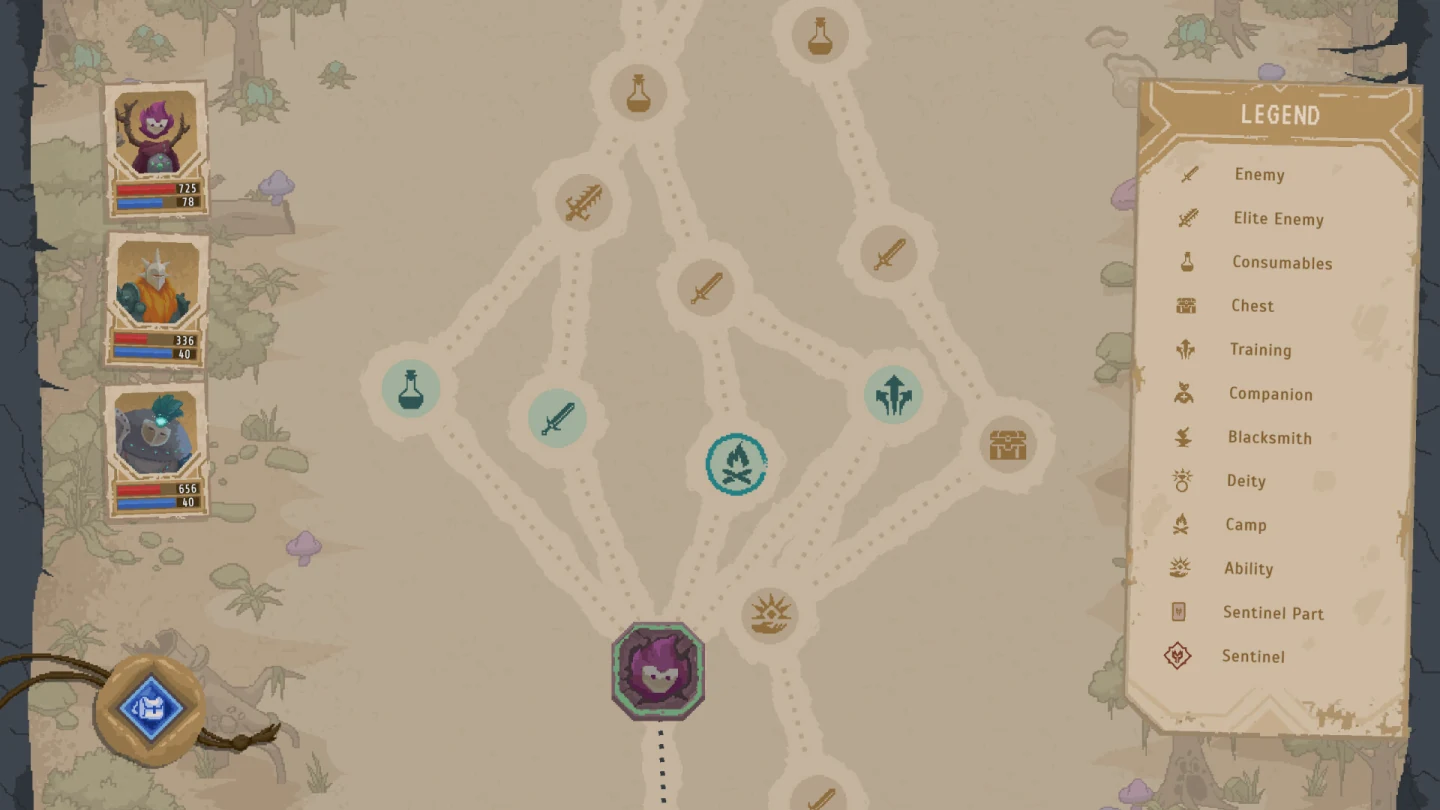
Use Enemy and Elite Enemy rooms for different risk levels
Choose an Enemy room when the party can handle standard combat and no other branch solves a more urgent need. Choose an Elite Enemy room only when the build has stable damage, enough survival, and a payoff reason that justifies added pressure. The exact legend labels make the risk distinction visible before the branch is selected.
Before an Elite Enemy, name the first dangerous target, the character protecting persistent Health, and the consumable or ability that can rescue the turn plan. If those answers are missing, prefer the lower-risk Enemy branch when available. Armor replenishes after combat, but Health persists, so a difficult victory can still weaken every later room.
| Room | Choose it when | Avoid it when |
|---|---|---|
| Enemy | The party needs a manageable combat step | Another icon solves an urgent recovery or role problem |
| Elite Enemy | Damage, survival, and target priority are stable | Persistent Health loss already threatens the route |
Choose Consumables and Chest rooms with a clear purpose
Use the Consumables icon when a currently presented supply can answer a named turn or route problem. A health potion should protect persistent Health, a mana potion should restore a specific ability sequence, and a bomb should help prevent an incoming action. Read the choice in the room rather than assuming one fixed offering.
Use the Chest icon when the party has a destination for another reward. Name the receiving grid and the damage, survival, or support job before taking the branch. A crowded party with no replaceable item gains less from a Chest than a party with open capacity or a clear weak piece.
- Consumables: name the immediate resource or turn problem first.
- Chest: name the receiving character grid first.
- Inspect the presented choice before committing resources.
- Choose another branch when neither room solves a current need.
Use Companion and Camp rooms for party continuity
Take a Companion room when the party is missing an automatic combat role another character can fill. Recruitment adds a separate equipment grid, but that capacity matters only when the companion receives a clear damage, survival, or support assignment. Read the shown ability conditions and choose for the role the current party lacks.
Take a Camp route when persistent Health loss makes the next fights unsafe. Camp is the recovery label in the current legend; compare the party's Health with every room required to reach it and reduce optional risk along the way. The related campfire guide covers the full recovery decision, while this map choice is about reaching recovery before Health pressure ends the route.
- Check whether a party role is absent or merely under-equipped.
- Choose Companion when a visible automatic job is missing.
- Choose Camp when persistent Health loss requires recovery.
- Inspect the rooms between the current node and the selected solution.
- Reassign grids and roles after recruitment, then reassess the route.
Use Training, Ability, and Blacksmith rooms for different jobs
Training, Ability, and Blacksmith are separate legend entries. Training is the dice-and-reward room: read the displayed requirement, available dice, and payoff before accepting the risk. Ability is a distinct room, so inspect the presented ability option without treating it as Training or inventing a fixed service menu.
Use Blacksmith when the currently presented gear improvement advances an equipped item with a clear party job. In all three rooms, decide from the choice on screen. An improvement label alone does not guarantee that the offered result fits the build, so preserve route flexibility when the current option does not solve a named problem.
- Training: compare the visible dice check and reward.
- Ability: inspect the distinct ability option presented in the room.
- Blacksmith: connect the presented gear improvement to an equipped role.
- Keep the three icons separate when planning the branch.
Treat biome-end Sentinel Parts as final-fight commitments
The current in-game UI labels the biome-end choice Sentinel Part and the final encounter Sentinel. Store and trailer-facing wording calls the same system Guardian Part and Guardian. These are two names for the same final-enemy system, not separate bosses or separate map progressions.
At each biome end, read the two presented Sentinel Part choices and select the pressure the build is better prepared to answer. Every selected part contributes to the final enemy's appearance and power, so carry the complete set into final-fight planning. Do not prepare for only the most recent part; later route upgrades and consumables should support the combined Sentinel state the run created.
Match the next room to one visible party problem
At every branch, state one visible problem: Health needs recovery, the party lacks a role, the grid needs a reward, resources are low, or the final Sentinel needs preparation. Then choose the exact legend label that addresses it. Use Deity only after reading the presented choice; the icon name alone does not define one fixed outcome.
After choosing, define success before entering. Camp should restore route stability. Companion should add a named automatic role. Consumables or Chest should solve a current resource or capacity need. Training, Ability, Blacksmith, and Deity should be judged by the option shown. Enemy risk should advance the route, while Sentinel Part choices should improve final-fight preparation.
| Party problem | Room direction | Success check |
|---|---|---|
| Persistent Health loss | Camp | Recovery restores a safer route margin |
| Missing automatic role | Companion | The recruit receives a clear damage, survival, or support job |
| Supply or grid need | Consumables or Chest | The presented choice has an immediate use or destination |
| Named improvement | Training, Ability, Blacksmith, or Deity | The on-screen choice advances the current plan |
| Prepared party seeking greater payoff | Elite Enemy | The added combat risk serves a clear route goal |
| Biome-ending commitment | Sentinel Part | The final Sentinel plan can answer the selected pressure |